Desklog provides you detailed and customizable reports for the following:
- Task Timesheet Report: View detailed information for each task.
- Team Timeline Report: See timeline details for every team member.
- Project List: Access the full list of projects and their details.
- Task Summary: Get a summary of each task’s details.
- Project Timesheet: Track time spent on each project by date.
- Timesheet Overview: View a detailed timesheet for every team member.
- Time Request: Review submitted time request details.
- Work Schedule: Check detailed schedules for each employee.
- Productive/Non-Productive Apps Report : Detailed breakdown of time spent on each app.
- User Report: See information on all registered users.
- Leave Report: View leave details for every team member.
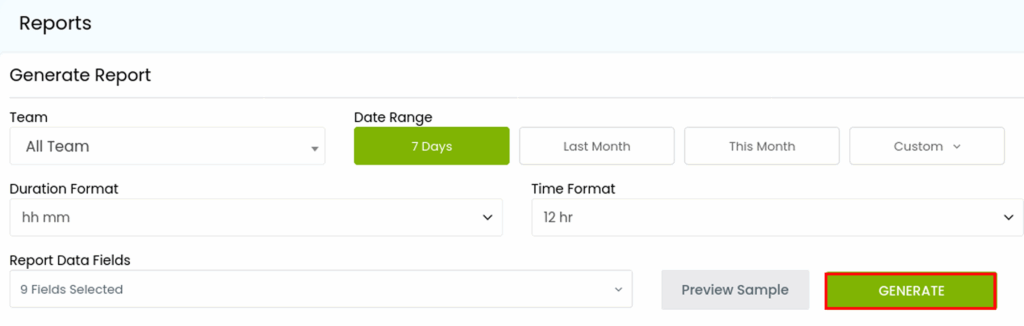
How To View All Reports?
Step 1: In the admin left panel, click on Analytics and from the drop down, select Reports.

Step 2: In the page that opens, click the drop down under the section Team to select the specific team you want to view the reports of.

Step 3: Next, select the Date Range.

Step 4: Next, select the Duration Format.

Step 5: Select the Time Format.

Step 6: Select the Data Fields to be displayed in the report.

Step 7: Click the Generate button to generate report.
How to View Task Timesheet Report?
Step 1: In the admin left panel, click on My Desklog.
Step 2: In the page that opens,scroll down till you reach the section titled Task Timesheet. You will find an export button.
Clicking the drop down next to it lets you customize the timesheet according to dates like Today, Yesterday, Last 7 Days, Last 14 Days, Last 28 Days or any range of dates you wish. Select the range you prefer.
Step 3: Click the Export button to download your Task Timesheet Report. It will let you view task details like:
- Task: Title or name of the task
- Project: Project to which the task belongs
- Start: Date the task began
- Status: Current progress status (e.g., in progress, paused, completed)
- Spent: Total hours worked on the task
- Assigned: Total time designated for the task
How to View Team Timeline Report?
Step 1: In the admin left panel, click on Timelines.
Step 2: In the page that opens, click on the dropdown on the top left to select the specific team you want to see the timeline report of.
Step 3: Navigate to the top right of the screen and click on the export button. This will open up a customization window where you can customize the file format as CSV or XLS.
Step 4: You can also customize the time details to be shown in the report:
- At Work
- Focus Time
- Task Spent
- Task Assigned
- Efficiency
- Clock In
- Clock Out
- Activity Percentage
- Productive
- Neutral
- Non Prod Time
- Idle
- Private
- Min Working Hr
- Over Time
- Timezone
- Desklog App Details
Step 5: You can also select the date range of the data to be displayed in the report into Today, Yesterday, Last 7 Days, This Month, Last Month and Custom Range.
Step 6: You can customize the time format as 12 hr or 24 hr and the duration format as hh mm (hours and minutes), mm (minutes) and ss (seconds).
Step 7: After selecting the options you wish to view, click the Export button.
How to View Project List Report?
Step 1: In the admin left panel, click on Projects and from the drop down, click on Project List.
Step 2: In the page that opens, you will see a long line of filters including:
- Project Name: Filter projects by their name.
- Access: Filter based on project visibility—Public or Private.
- Status: Filter projects by their current status—Ongoing, On Hold, or Completed.
- Priority: Filter by priority level—Critical, Intermediate, Low, or Trivial.
- Client: Filter projects by associated client.
- Users: Filter projects by assigned team members.
Step 3: Configure the filters as you prefer and click the Filter button.
Step 4: To download and view the report, click the Export button. Apart from filters you’ve applied, you can also view additional details like:
- End Date
- Task Assigned Hours
- Task Spent Hours
- Project Estimated Hours
- Project Estimated Amount
- Profit/Loss
How to View Task Summary Report?
Step 1: In the admin left panel, click on Projects and from the drop down, click on Project Timesheet.
Step 2: In the page that opens, you will see a long line of filters including:
- Project: Filter projects by their name.
- Teams: Filter projects by team name.
- Users: Filter projects by user name.
- Status: Filter projects by their current status—In Progress, Pause, Done.
- Type: Filter projects by billable type- Billable or Non- Billable.
- Tags: Filter projects by tags.
Step 3: Configure the filters as you prefer and click the Filter button.
Step 4: To download and view the report, click the Summary button. Apart from filters you’ve applied, you can also view additional details like:
- Task
- Project Id
- Client Name
- Assignee
- Reporter
- Start Date
- End Date
- Billable
- Spent
- Assigned
- Hourly Rate
- Billable Amount
How to View Project Timesheet Report?
Step 1: In the admin left panel, click on Projects and from the drop down, click on Project Timesheet.
Step 2: In the page that opens, you will see a long line of filters including:
- Project: Filter projects by their name.
- Teams: Filter projects by team name.
- Users: Filter projects by user name.
- Status: Filter projects by their current status—In Progress, Pause, Done.
- Type: Filter projects by billable type- Billable or Non- Billable.
- Tags: Filter projects by tags.
Step 3: Configure the filters as you prefer and click the Filter button.
Step 4: To download and view the report, click the Export button. Apart from filters you’ve applied, you can also view additional details like:
- Project / Task
- Task Assignee
- Date
- Spent Time
- Assigned Time
How to View Timesheet Overview?
Step 1: In the admin left panel, click on Timesheets and from the drop down, click on Overview.
Step 2: In the page that opens, you have the option to filter timesheets by team and date (daily, weekly, monthly).
Step 3: Configure the filters as you want and click the Export button. In the report, you can see details such as:
- Name/Email
- Team
- Clock In
- Clock Out
- Time At Work
- Focus Time
- Productive Time
- Over Time
How to View Time Requests?
Step 1: In the admin left panel, click on Timesheets and from the drop down, click on Time Requests.
Step 2: In the page that opens, you have the option to filter time requests by team and date (daily, weekly, monthly).
Step 3: Configure the filters as you want and click the Export button. In the report, you can see details such as:
- Name/Email
- Request From
- Request To
- Request Date
- Time Range
- Description
- Current Status
- Updated By
How to View Work Schedule?
Step 1: In the admin left panel, click on Timesheets and from the drop down, click on Work Schedule.
Step 2: In the page that opens, you have the option to filter time requests by team and date (daily, weekly, monthly).
Step 3: Configure the filters as you want and click the Work Schedule Excel button. In the report, you can see details such as:
- Date
- Shift time
- Minimum hours
- Name
- Team
- Clock In
- Clock Out
- Time At Work
- Idle+Private time
How to View Productive/Non-Productive Apps Report?
Step 1: In the admin left panel, click on Activity and from the drop down, click on Apps.
Step 2: In the page that opens, scroll down till you reach a section titled Productive Apps/ Neutral Apps/ Nonproductive Apps.
Step 3: Click on the export button on the left corner. This will open up a customization window where you can customize the file format as CSV or XLS.
Step 4: You can also choose to customize the reports to show:
- Productive Apps
- Non- Productive Apps
- Neutral Apps
Step 5: You can select the date for which the report is to be shown.
Step 6: Click on the export button on the customization window to download the report. In it, you can view details like:
- Employee Name
- App Name
- Total Time
- Percentage
How to View User Report?
Step 1: In the admin left panel, click on Register and from the drop down, click on User.
Step 2: In the page that opens, you have the option to filter users by:
- Team
- Name/Email
- Roles
- Status (Active/ Inactive)
- Tracking Type (Desklog App/ Webtimer)
Step 3: Configure the filters as you prefer and click the Filter button.
Step 4: To download and view the report, click the Export button.
How to View Leave Report?
Step 1: In the admin left panel, click on Leaves and from the drop down, click on Report.
Step 2: In the page that opens, you have the option to filter reports by team, name/ email, month and year.
Step 3: In the monthly report, you can view details such as:
- Name
- Total Working Days
- Attended Days
- Total Leaves
- Approved Leaves
- Other Leaves (Paid and Unpaid)
Step 3: In the yearly report, you can view details such as:
- Name
- Available Leaves
- Remaining Leaves
- Pending Requests
- Leaves Taken (Paid and Unpaid)