
Desklog Integrated With Jira Project Management
Updated on November 23rd, 2023
I’m excited to share the latest news with you – Desklog’s brand new integration with Jira Project Management Software.
To begin with, you all know that Desklog is a time tracking software. It tracks how you spent your work hours in a day. It captures not only active work periods but also identifies idle and offline times, all while diligently tracking your projects and tasks throughout the day.
And Jira is a project management tool developed by Atlassian. Jira helps teams plan, track, and manage their project. It’s especially popular among software development teams, but its powers extend to various industries.
Let’s explore the synergy between Desklog and Jira, where time tracking and project management is effortlessly done. Discover how these two help businesses soar in the coming sections.
What is Desklog Jira Integration?
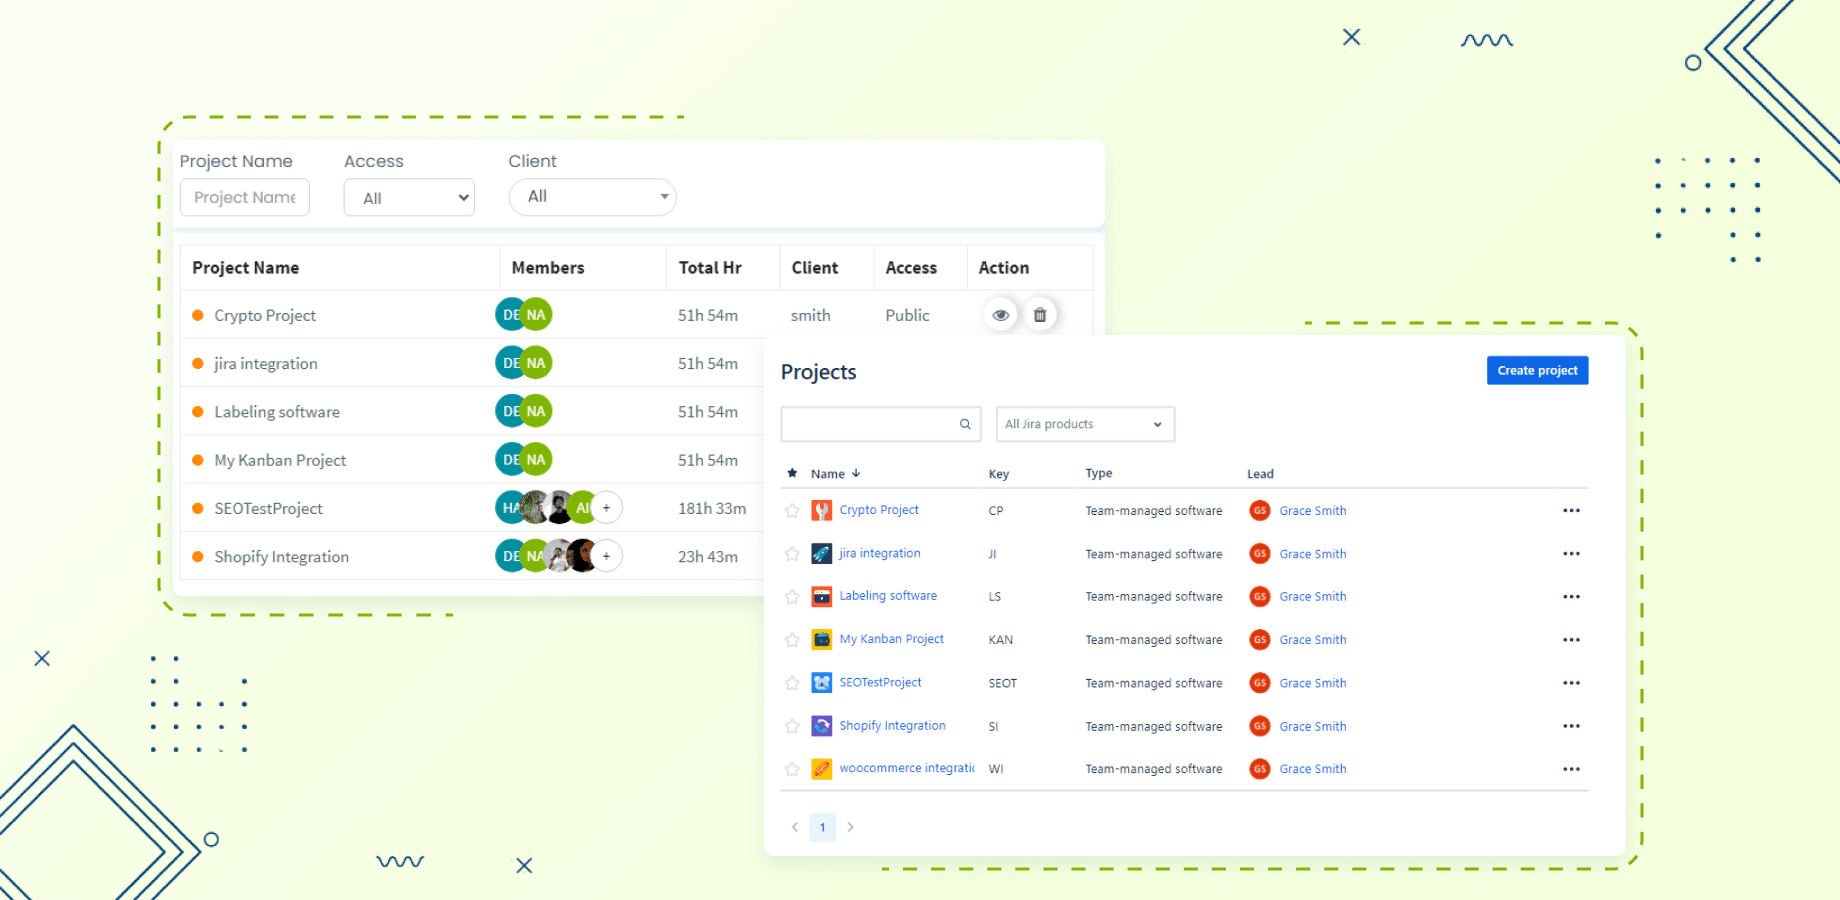
To put it simply, Desklog has introduced its integration with Jira project management software. That is, all the projects and tasks you created in Jira are synchronized in Desklog. And no need for manual calculations of time spent on projects and tasks as Desklog tracks everything automatically with its feature – project time tracking. By this integration, users, businesses, entrepreneurs can gain valuable insights into one’s productivity levels. The best part of this integration is, with Desklog you can track when the user is running the tasks and under which projects. You gain accurate reports of when the user is doing the tasks and when they are not.Why Do Businesses Need Desklog Jira Integration?
1. Accurate Time Tracking
Desklog’s precise time tracking features, when integrated with Jira, provide a comprehensive overview of how time is allocated across different project tasks. This not only aids in billing and invoicing but also serves as a valuable tool for optimizing resource allocation and project timelines.2. Project Synchronization
By integrating with Jira, Desklog streamlines the workflow by automatically syncing projects and tasks created within Jira into the Desklog platform. This synchronization ensures that all project-related information, including tasks, timelines, and updates, is effortlessly mirrored within Desklog, providing a centralized hub for tracking, managing, and monitoring project progress.3. Real-Time Project Visibility
Imagine having a bird’s eye view of your projects at any given moment. With Desklog Jira Integration, real-time project visibility becomes a reality. Managers can track progress, identify bottlenecks, and make data-driven decisions to keep projects on track. This level of transparency fosters collaboration and ensures that everyone is aligned towards the common goal.4. Client Billing
This integration streamlines the process of capturing and documenting billable hours, tasks completed, and project progress directly into a centralized system. It enables a synchronized approach where the time spent on specific tasks within Jira projects gets automatically recorded in Desklog. This synchronized data provides accurate insights into the time invested in various client projects, allowing for precise billing calculations based on actual hours worked.5. Seamless Collaboration
Desklog Jira Integration promotes seamless collaboration by bringing communication and task management under one roof. Team members can easily share updates, know what they are doing, and collaborate in real-time without the need for constant back-and-forth between different platforms.6. Streamlining Workflows
The integration of Desklog and Jira streamlines workflows by seamlessly blending time tracking functionalities with robust project management capabilities. This means no more toggling between different tools or dealing with fragmented data. With Desklog Jira Integration, your team can effortlessly navigate tasks, track time, and manage projects, all in one centralized platform.7. Enhanced Productivity
The fusion of time tracking and project management fosters a culture of accountability and productivity. With Desklog capturing the nuances of work hours and Jira orchestrating project tasks, teams gain a holistic view of their efforts. This transparency not only boosts individual productivity but also empowers managers to make informed decisions based on real-time data.How to Install Desklog Jira Plugin
Follow these easy steps to install and configure the plugin, ensuring a smooth workflow within your Jira dashboard. You can also watch the youtube video for a visual demonstration of these steps.step 1
Log in to Jira Software
Begin by logging in to your Jira dashboard. Once logged in, you’ll find yourself on the dashboard, ready to optimize the project management process.step 2
Access the Apps Menu
Navigate to the Apps menu and select Desklog. If you’re already integrated with Desklog with Jira, your Jira account will display all the connected users.step 3
Manage Apps for Integration
If you haven’t integrated Desklog, Click on ” Apps” and select “Manage Your Apps” from the drop down list to initiate the Desklog -Jira integration process.step 4
Configure Desklog in Jira Platform
Select Desklog from the apps list and click on “Configure” to start the setup process. You’ll be prompted to submit the access token & get it from the desklog.step 5
Copy the Access Token
Open Desklog admin account, navigate to Settings, & choose “Integrations.” Select Desklog Jira Integration , click on “Show Access Key” and copy the key.step 6
Paste the Access Token
Return to your Jira dashboard, paste the access token in the Configuration Panel, and wait for the confirmation message upon successful integration.Now, you have to integrate each user in the desklog with Jira. For that follow the below steps.
step 7
Manage Registered Users
Now you can open the Desklog app from the Jira App list to view all the Desklog users who are connected through the integration of Desklog and Jira.step 8
Copy Jira User Account ID
Copy the Jira account ID of the users you wish to integrate with Desklog. Then, open Desklog, click on Register, and select Users. Choose the specific user.step 9
Register Users in Desklog
Now you can integrate that particular user to jira by clicking the “Jira Account Settings,” and paste the copied Jira account ID, and click on the save button.step 10
Completion and Congratulations
Upon completing these steps, the integration process for the chosen user is finished. Congratulations!You can now enjoy the benefits of a integrated workflow between Desklog and Jira.How Desklog Jira Plugin Works?
Desklog Jira plugin seamlessly synchronizes projects and tasks to enhance collaboration and efficiency. Let’s take a closer look at how this integration works and how it can elevate your project management experience.Creating Projects in Jira
The journey begins on your Jira dashboard. To kickstart a project, simply follow these steps:- Navigate to Projects: Click on the “Projects” tab on your Jira dashboard.
- Create a New Project: In the project section, opt for “Create Project.”
- Choose Kanban Mode: Select the Kanban mode for your project.
- Use a Template: Click on “Use Template” to streamline the process.
- Enter Project Details: Enter your project name and hit “Next.”
- Access Your Project: Click on “Go to your project” in Jira to access the newly created project.
Managing Tasks Across Platforms
Now that your project is set up, it’s time to add tasks. Head back to Jira and follow these steps:- Create New Task: Click on “Create New Issue” in Jira.
- Mark as Task: When creating the issue, mark it as a task and provide a name.
- Refresh in Desklog: Open Desklog and refresh the project page to see tasks imported from Jira.
Effortless Status Updates
Change the status of a task in Jira from “To Do” to “In Progress” by a simple drag-and-drop action. The beauty of integration shines as Desklog instantly reflects this status change. And once a task is done in Jira, a swift drag-and-drop to “Done” triggers an automatic update in Desklog. Desklog’s Jira integration simplifies project and task management by bridging the gap between the two platforms. Effortlessly create projects, add tasks, assign users, and update statuses, all with the power of seamless synchronization. Now how does desklog come into play? Desklog, with its robust integration with Jira, goes above and beyond, providing features like project time tracking, project timesheet, and project billing. Let’s delve into the details of how each feature contributes to elevating project outcomes and efficiency.1. Project Time Tracking
Task level Tracking
Track the time spent on individual tasks, gaining granular insights into the project’s development.
Real-Time Progress Tracking
Keep a pulse on your project’s real-time progress, enabling timely interventions if needed.2. Project Timesheet
 Understanding the intricacies of project timelines is crucial for effective planning and evaluation. Desklog’s project timesheet feature offers detailed reports, shedding light on task initiation, completion, and resource allocation.
How it Works:
Understanding the intricacies of project timelines is crucial for effective planning and evaluation. Desklog’s project timesheet feature offers detailed reports, shedding light on task initiation, completion, and resource allocation.
How it Works:

Comprehensive Task Reports
Access detailed reports for each task under a project, including allocation date, time spent, initiation date, completion date, assignee details, and more.
User Accountability
Identify the assignee and the person responsible for task allocation, facilitating a transparent accountability structure.3. Project Billing
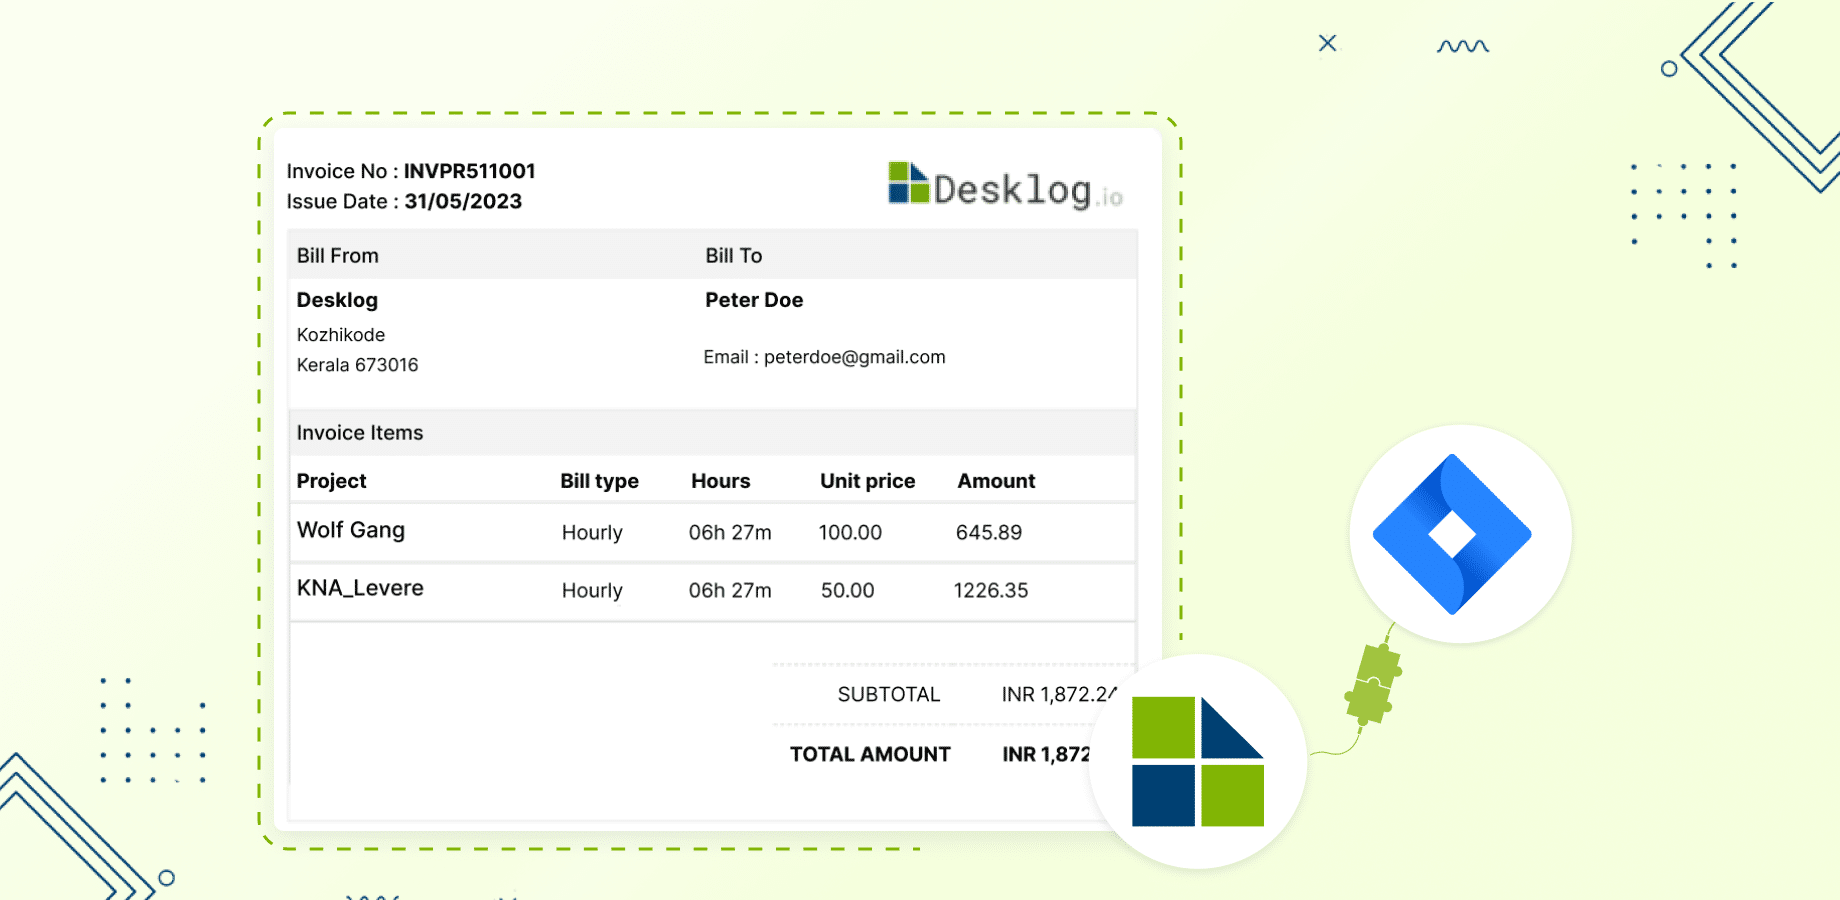 For many organizations, project success is measured not only in terms of completion but also in monetary gains. Desklog’s project billing feature empowers you to seamlessly bill clients based on time spent on tasks or the overall project.
How it Works:
For many organizations, project success is measured not only in terms of completion but also in monetary gains. Desklog’s project billing feature empowers you to seamlessly bill clients based on time spent on tasks or the overall project.
How it Works:

Task-Based Billing
Bill clients for the time invested in each task, providing a transparent breakdown of efforts.
Project-Level Billing
Calculate and bill for the hours spent on the entire project, offering a holistic view of the project’s value.
User-Specific Billing
Tailor billing to each user under a project, ensuring fair compensation for individual contributions.In Summary
As we discussed, Desklog Jira integration emerges as a beacon of efficiency, seamlessly blending advanced features to redefine how we approach project evaluation. As we bid adieu to this exploration into the synergy of Desklog and Jira, it’s clear that this integration is a dynamic partnership that transforms project management into an art. So, embrace this era of streamlined efficiency, where Desklog and Jira converge to create a symphony of productivity. Here’s to a future where projects aren’t just handled; they’re perfected!Meet The Author

Abdul Majid

Co-founder and DevOps Manager at Desklog